TL;DR:
- Proper permitting, HOA approval, and regional considerations are essential before starting construction in the West Valley.
- The 10-stage workflow guides builders through land prep, framing, inspections, and final inspection for successful projects.
- Active homeowner involvement and understanding regional challenges help prevent costly delays and warranty issues.
Starting a residential construction project in the West Valley without a clear roadmap is like driving through Buckeye without GPS. You know your destination, but every wrong turn costs you time, money, and plenty of headaches. Homeowners in Goodyear, Buckeye, and west Phoenix regularly run into unexpected permit delays, HOA conflicts, failed inspections, and weather-related setbacks that nobody warned them about. This guide breaks down the exact workflow you need, from permits and planning through final inspection and warranty protection, so you can move forward with real confidence and zero guesswork.
Table of Contents
- What you need before starting: Permits, approvals, and planning
- Stages of residential construction: Step-by-step workflow
- Inspections, verification, and warranty: Protect your investment
- Common mistakes and how to prevent them: West Valley-specific tips
- What most guides miss about residential construction workflow
- Get expert guidance for your West Valley construction project
- Frequently asked questions
Key Takeaways
| Point | Details |
|---|---|
| Permits and planning | Start with HOA approvals and city permits, allowing buffer time for unpredictable reviews. |
| 10-stage workflow | Follow a structured process covering lot prep, foundation, framing, insulation, exterior, drywall, and finishes for best results. |
| Inspections matter | Verify work at key milestones—pre-drywall, rough-ins, final—to ensure code compliance and protect your investment. |
| Common mistakes | Avoid errors like skipping HOA, insufficient soil compaction, and poor scheduling during monsoon season. |
| Expert support | Reliable general contractors make workflow easier, anticipate regional issues, and provide lasting quality. |
What you need before starting: Permits, approvals, and planning
Most homeowners underestimate what happens before a single shovel hits the ground. The preparation phase is where projects succeed or fail, and in the West Valley, there are layers to this process that are specific to the region.
Permits and city review
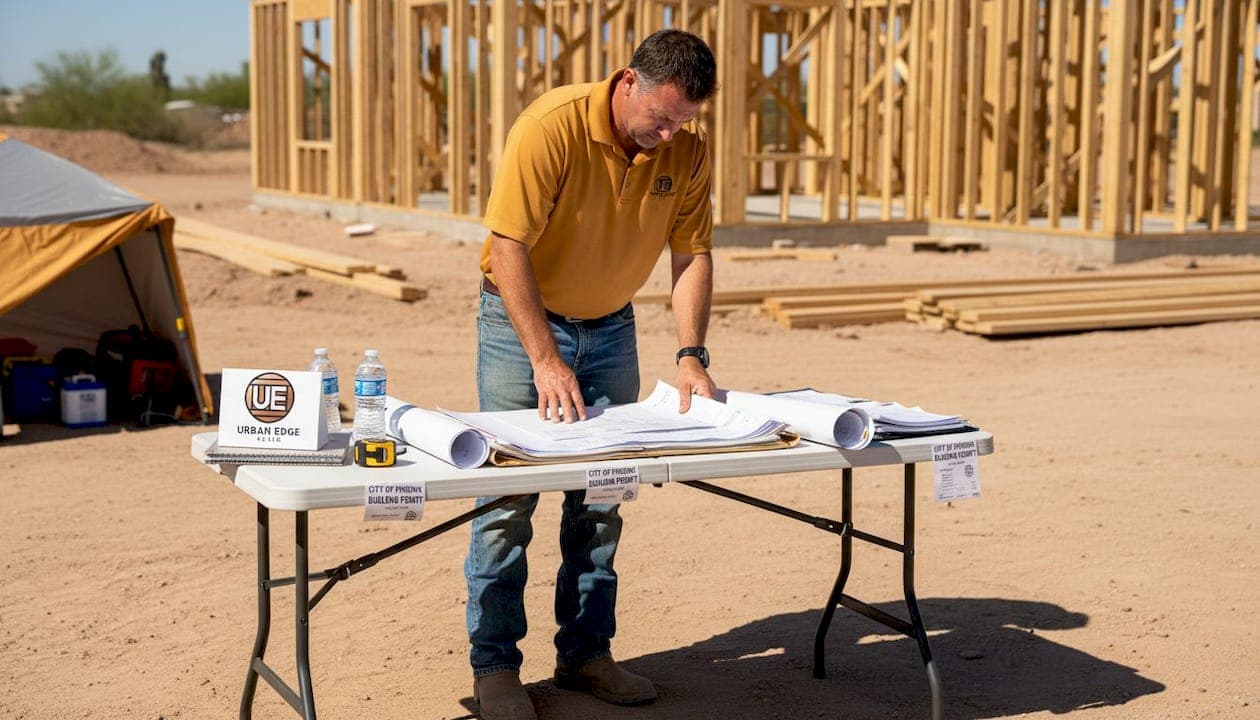
The residential building process in Phoenix and neighboring West Valley cities like Goodyear and Buckeye requires you to submit two complete sets of plans, a plot plan, and supporting calculations before anything else. City staff review those documents for completeness and code compliance. If corrections are needed, the plans go back to you, get revised, and return for a second review. Once everything checks out, you pay your fees and the permit is issued. No permit means no legal construction, period.
Grading and drainage permits come first if your project involves any land reshaping or water management. This is not optional in the West Valley, where soil variability and seasonal monsoon runoff make drainage a serious engineering concern. You cannot legally begin foundation work until grading permits are cleared.
Pro Tip: Start your HOA approval process at the same time you begin preparing permit documents, not after. HOA reviews often take several weeks, and running these tracks in parallel saves significant time. Many homeowners make the costly mistake of waiting until city permits are approved before approaching their HOA, only to find the HOA has design objections that require revisions and force a full restart of the city permit process.
Regional planning considerations
West Valley soil is notoriously variable. Some lots have dense, stable caliche (a hardened calcium carbonate layer) while others sit on looser sandy soil that requires significant grading and soil compaction work before a foundation is safe. Getting a soil report before finalizing your design is money well spent.
Heat is another factor that shapes every decision. Arizona construction specifics require insulation ratings and HVAC systems in the SEER 18-21 range to meet energy codes and keep your utility bills manageable in a region that sees temperatures above 110°F for weeks at a time. Your designer and general contractor need to factor this into the plan from day one, not as an afterthought.
Monsoon season runs from mid-June through September. Concrete pours and framing work done in heavy rain can result in structural problems down the line. Smart builders schedule around this window or build delays into the project timeline to account for it. Check in with your West Valley permit sequence to understand how local jurisdictions handle weather-related construction pauses.
Pre-construction documentation checklist
Before breaking ground, confirm you have every item on this list:
- Signed and stamped architectural plans (two complete sets)
- Plot plan showing setbacks, easements, and utilities
- Soil report and compaction testing results
- Grading and drainage permit (if applicable)
- HOA approval letter in writing
- City building permit with fee receipt
- Contractor license verification and insurance certificates
- Utility location reports (call 811 before digging)
| Document | Who provides it | When needed |
|---|---|---|
| Architectural plans | Designer or architect | Before permit application |
| Soil report | Geotechnical engineer | Before design finalization |
| HOA approval | HOA board | Before city permit submission |
| City permit | Local building department | Before construction begins |
| Grading permit | City engineer's office | Before any earthwork |
| Contractor insurance | General contractor | Before contract signing |
Getting this paperwork in order feels tedious, but every missing item is a potential project shutdown. The West Valley's rapid growth means building department offices in Goodyear and Buckeye are busy. Incomplete applications get returned, and that delay alone can push your project start date back by weeks.
Stages of residential construction: Step-by-step workflow
With permits secured and documents organized, the physical build begins. Understanding each stage helps you ask the right questions, spot problems early, and hold your contractor accountable at every milestone.
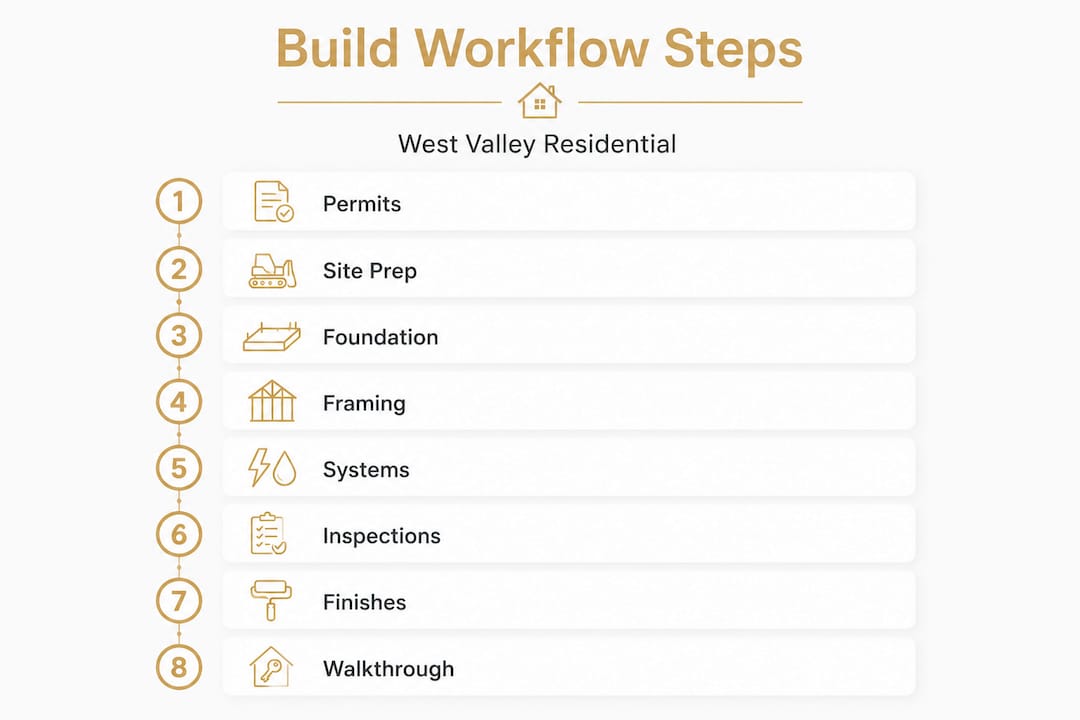
The 10 workflow stages for West Valley new builds
The 10-stage construction process for new homes in Arizona follows a strict sequence because each stage depends on the previous one being correctly completed.
-
Lot preparation. The crew grades the land, removes debris, and performs soil compaction testing. In the West Valley, caliche layers sometimes require breaking or removal. Skipping thorough compaction here causes foundation settlement later.
-
Underground utilities. Plumbing, electrical conduit, and gas lines get placed before the slab is poured. This is the only chance to position these correctly without tearing up concrete.
-
Slab foundation. Concrete is poured over a gravel base with rebar reinforcement. Slab foundations are standard in the West Valley due to soil conditions and the absence of freezing temperatures.
-
Framing. Walls, floor systems (in two-story builds), and roof trusses go up. This is when your home first takes shape visually. Inspectors check framing before anything is covered.
-
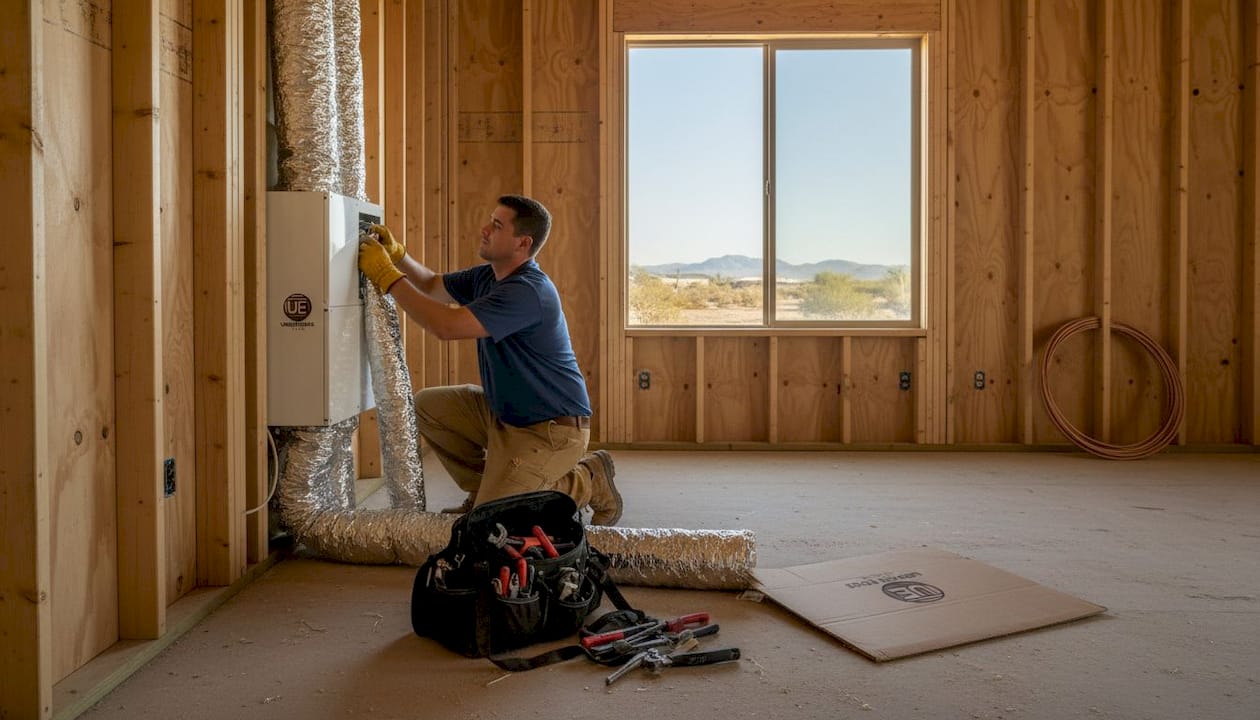
Rough-in mechanical systems. Plumbing, electrical wiring, and HVAC ductwork are roughed in through wall cavities and ceiling spaces before insulation or drywall.
-
Insulation. Given Arizona's extreme heat, proper insulation is critical. Spray foam and high-density batts are common in West Valley builds to meet energy code and maintain comfortable indoor temperatures.
-
Exterior work. Sheathing, housewrap, windows, doors, and roofing materials are installed, weatherproofing the structure before interior finishes begin.
-
Drywall installation. Sheets are hung, taped, mudded, and sanded. The pre-drywall inspection (covered in the next section) happens right before this stage.
-
Finish work. Cabinets, countertops, trim, paint, flooring, fixtures, and appliances are installed. This stage is the longest and requires the most coordination between trades.
-
Landscaping and final inspection. Desert-friendly landscaping goes in, and the city conducts a final inspection before issuing your Certificate of Occupancy (CO), which is the legal document confirming the home is safe to live in.
Pro Tip: For complex tile patterns, specialty woodwork, or custom cabinetry, require physical mock-ups before the installer proceeds with the full scope. A mock-up is a small sample panel built in place for your review and approval. This practice, emphasized by hands-on construction oversight experts, prevents costly tear-outs when expectations and execution don't match.
Design-build vs. traditional contractor: Which works better?
| Factor | Design-build model | Traditional model |
|---|---|---|
| Communication | Single team handles design and build | Designer and contractor are separate entities |
| Timeline | Faster, fewer handoffs | Slower, more coordination needed |
| Cost management | Budget tracked from design phase | Surprises can emerge after design is final |
| Accountability | One contract, one point of contact | Multiple contracts, possible finger-pointing |
| Customization | Easier to adjust mid-project | Changes require renegotiation with multiple parties |
A design-build model means your architect, project manager, and construction crew are all under one roof. For West Valley homeowners pursuing a remodeling workflow, this integrated approach eliminates the communication gaps that cause mistakes, delays, and budget blowouts. The traditional model can work for straightforward builds, but any project with custom details or tight timelines benefits significantly from design-build coordination.
Careful sequencing is the invisible backbone of a successful build. Miss the timing on rough-in inspections and you cannot pour the slab. Pour the slab before compaction tests are complete and you risk settlement cracking. Every stage has dependencies, and an experienced general contractor manages those sequences proactively rather than reactively.
Inspections, verification, and warranty: Protect your investment
Inspections are not bureaucratic nuisances. They are your primary protection against hidden defects that could cost tens of thousands of dollars to fix after the fact.
When inspections happen and why each one matters
Key inspection stages in residential construction include the pre-drywall inspection, rough-in mechanical inspection, and final inspection before CO issuance. Each one is a checkpoint where a city inspector reviews the work completed to that point.
The pre-drywall inspection is arguably the most valuable. Once drywall covers the walls, no one can see what is inside without tearing the walls open. This inspection verifies framing, blocking, insulation, and rough-in mechanical work before everything gets hidden. Request your own walkthrough at this stage as well. Bring a flashlight and look for anything that seems off, then document it in writing with your contractor.
The rough-in inspection covers plumbing, electrical, and HVAC systems after they are installed but before they are connected to fixtures and finished components. Inspectors check pipe sizing, wire gauges, duct placement, and code compliance at this stage.
The final inspection covers everything at once: the completed structure, all systems operational, safety features in place, and exterior conditions met. Passing this inspection triggers issuance of the Certificate of Occupancy.
"A Certificate of Occupancy is not just paperwork. It is the legal confirmation that your home was built to code and is safe for habitation. Without it, you cannot legally occupy the property, and many mortgage lenders will not fund the final disbursement."
Documenting corrections and sign-offs
Every inspection that results in a correction notice needs to be taken seriously and documented carefully. Request a copy of every inspection report. When corrections are completed, photograph the work before it is covered. Keep a running log with dates, inspector names, and descriptions of what was reviewed. This paper trail protects you during warranty claims and potential future sales.
The 11-month warranty check: A best practice most homeowners skip
Most new construction in the West Valley comes with a one-year builder's warranty. The 11-month inspection is a professional walkthrough conducted one month before that warranty expires. The goal is to catch every defect, crack, settlement issue, or mechanical problem while the builder is still legally obligated to fix it.
This is not something to skip or forget about. Items covered in a thorough 11-month inspection include:
- Foundation and slab settling or cracking
- Roof flashing gaps or shingle issues
- HVAC system performance under full load
- Plumbing leaks at joints and fixtures
- Door and window alignment shifts
- Grout or caulk separation in wet areas
- Exterior stucco cracks or paint bubbling
- Cabinetry hardware and door alignment
Hiring a licensed home inspector for this walkthrough costs a few hundred dollars and can save you thousands in repairs you would otherwise pay out of pocket after warranty expiry.
Common mistakes and how to prevent them: West Valley-specific tips
Even well-intentioned homeowners and contractors make avoidable mistakes in West Valley residential construction. Knowing what to watch for puts you in a far better position.
The most frequent project-killing mistakes
Permit sequencing errors. Failing to secure HOA approval before starting the city permit process is one of the most common and costly mistakes in West Valley neighborhoods. Arizona-specific edge cases consistently show HOA conflicts as a leading cause of project delays. Run both tracks simultaneously and get HOA approval in writing before committing to a construction start date.
Insufficient soil compaction. West Valley soils vary dramatically across neighborhoods. Some areas near the Gila River corridor have expansive clay soils that swell with moisture and shrink in the dry heat, causing foundation movement. Skipping or rushing geotechnical work to save money upfront is how homeowners end up with cracked slabs five years later. Insist on certified compaction testing with written results before the concrete pour.
Skipping mock-ups and on-site reviews. Precision oversight during finish work catches problems before they become permanent. Tile set at the wrong angle, paint color that looks completely different in Arizona's harsh sunlight compared to the showroom, or cabinet proportions that feel off in the actual space are all avoidable when you require physical mock-ups and walk the project site regularly during finish-out.
Underestimating heat impact on materials. Construction adhesives, caulks, roofing materials, and exterior paint all behave differently in extreme heat. Products not rated for desert climates degrade faster, leading to premature repairs. Specify products designed for high-temperature environments and verify with your contractor that every exterior material meets Arizona climate standards.
Weather mismanagement. Concrete poured in direct summer sun without shade, wet curing, or temperature management develops micro-cracks that compromise structural integrity. Monsoon rains introduce moisture into framed walls before they are sheathed, which creates mold risk. A contractor who does not have a weather management protocol is a red flag. Ask specifically how they handle summer heat during concrete pours and what their plan is for protecting open framing during monsoon season.
For lots with slopes or drainage challenges, the right gravel selection for AZ grading makes a measurable difference in long-term drainage performance and erosion prevention around your foundation.
Pro Tip: Always build a buffer of four to six weeks into your project timeline specifically for monsoon season. If your build runs from April through October, account for at least three to four weeks of weather-related slowdowns between July and September. Contractors who promise tight timelines without this buffer are setting you up for disappointment.
- Never sign off on framing before a licensed inspector reviews it
- Require written documentation for every design or scope change
- Verify your contractor pulls all permits in their name, not yours
- Confirm HVAC equipment SEER ratings meet Arizona energy code before installation
- Check that exterior stucco systems include a weather-resistant barrier behind them
- Do not landscape until final grading is complete and drainage is verified
What most guides miss about residential construction workflow
Most workflow guides treat construction as a linear checklist. Complete step one, check the box, move to step two. That framing misses the reality of what makes West Valley projects succeed or fail.
The truth is that a successful build is less about following a sequence and more about anticipating regional friction points before they become expensive problems. Arizona's combination of extreme heat, variable soil, active HOA communities, and monsoon weather creates a project environment unlike most of the country. A contractor who has built homes in the Midwest or Southeast and relocated to the West Valley brings technical skill but can miss the regional context entirely.
What we have observed across projects in Buckeye, Goodyear, and west Phoenix is that the best outcomes consistently come from teams that treat local knowledge as a core competency, not an afterthought. Understanding that the caliche layer on one street behaves completely differently than the lot two blocks away matters. Knowing which HOA communities have 30-day review cycles versus 90-day cycles affects the entire project schedule. These are not details you learn from a textbook.
The shift to design-build models in the West Valley residential market reflects this reality. When designers and builders work as a single integrated team, issues surface at the planning stage rather than mid-construction. A builder who sees the architectural plans early can flag problems with how a detail will actually be executed in Arizona heat before permits are even submitted. That early issue surfacing saves money, time, and stress.
Our honest perspective: the homeowners who get the best results are the ones who stay engaged throughout the build. Not micromanaging, but participating. Showing up for the pre-drywall walkthrough. Reviewing inspection reports. Asking their contractor specific questions about sequencing and materials. An informed homeowner is a contractor's best accountability partner. The passive approach, where you hand over the keys and show up at the end, works sometimes, but it also accounts for most of the costly surprises we hear about from homeowners who come to us after a project goes sideways.
Energy efficiency is another area most workflow guides gloss over. In a climate where cooling costs dominate household energy budgets, the insulation choices, window specifications, and HVAC equipment selected during planning have a 20 to 30 year financial impact. Treating these as budget line items to cut is shortsighted. Prioritize them as long-term investments from the start.
Get expert guidance for your West Valley construction project
Knowing the workflow is a strong start, but executing it well takes experience, local relationships, and a team that has solved the specific problems that come with building in the West Valley.
Urban Edge AZ LLC works with homeowners across Buckeye, Goodyear, and west Phoenix to manage residential construction and remodeling projects from initial planning through final walkthrough. Whether you are thinking about a full kitchen and home remodeling project or exploring custom home builds from the ground up, we bring the local knowledge and hands-on oversight that West Valley projects demand. Before you sign with any contractor, take a few minutes to review common contractor warning signs so you know what to watch for. Reach out for a consultation and get a clear project plan tailored to your lot, your goals, and your timeline.
Frequently asked questions
How long does residential construction take in West Valley AZ?
A new build typically takes 6 to 12 months, but permit review timelines are unpredictable, and customizations add time; always plan a buffer of several extra weeks into your schedule.
What is the most common permitting mistake in West Valley projects?
Neglecting to secure HOA approval before starting city permits causes delays; the Arizona edge case of HOA-first sequencing is a consistent source of project setbacks, so always address HOA requirements before submitting to the city.
How do inspections work in residential construction?
City inspectors review your project at pre-drywall, rough-in stages, and final completion, and each stage must pass before work can proceed to the next phase.
Is slab foundation always used in the West Valley?
Yes, slab foundations are the standard across the West Valley because local soil and climate conditions make them the most practical and cost-effective foundation type for this region.
How can homeowners protect their warranty after construction?
Schedule a thorough 11-month warranty inspection with a licensed home inspector before your builder's warranty expires to identify and document any defects that qualify for covered repairs.